B Introduction to Rmarkdown
B.1 Install Rmarkdown
Rmarkdown is a file format that helps you write reports which combine texts, codes and code outputs in an easy way. This will be very helpful when you write a data analysis report or a tutorial where you want to include the results or plots of your code directly into a reader-friendly document file format such as HTML, PDF or Word. In fact, this book was written in Rmarkdown as well!
In order to work with Rmarkdown, you will need to install the rmarkdown package
To write a new .Rmarkdown file:
Click File > New File > R Markdown or
click the New File button under the File button in the top left of the RStudio window, then choose R Markdown.
You can choose the output format that you want, but usually we will choose PDF or HTML format. To generate PDF output, you will need to install LaTeX. You can install an independent LaTeX distribution, for example, personally I use MiKTeX. However, for anyone who never uses LaTeX before, you can just install tinytex, which is a convenient, lightweight, and beginner-friendly LaTeX distribution
B.2 Components of A Rmarkdown File
B.2.1 Metadata
When you open a new .Rmarkdown file, you will see that the top of the file contains some information about the file, for example, title, date, output format, etc. This component is written in between two --- signs. This is called the metadata block, or the YAML front matter, of the file. You can change information of the file such as title, date, and author.
B.2.2 Texts and Maths
After specifying the metadata, you can start writing the texts. The text is written using the markdown language. Basically you can just write whatever text you want. Other caveats about formatting, headings, tables, colors, links, etc. can be found here.
Maths can be typed using LaTeX syntax inside two dollar signs, for example $3^2$ will result in \(3^2\). More information about LaTeX math syntax can be found here.
B.2.3 R Codes and Results
You can add R code chunks into the Rmarkdown document by clicking the green +C button under the code file tab and choose R.
Figure B.1: Adding a code chunk
An R code chunk starts with ```{r} and ends with three back ticks ```. You can set options to the code chunks. Three of the most important options are
eval=TRUE: This default option means that Rmarkdown will evaluate your code when “knitting” the.Rmarkdownfile into PDF (or HTML, or Word). Ifeval=FALSE, then Rmarkdown will not evaluate your code when knitting. You can use this option by typing```{r, eval=FALSE}. This is useful when you just want to show the code but don’t want to run it.echo=TRUE: This default option means that Rmarkdown will display your code when “knitting” the file. The optionecho=FALSEmeans that Rmarkdown will not display your code when knitting the file.include=TRUE: This default option means that Rmarkdown will display your code and its output/result when “knitting” the file. On the other hand, the optioninclude=FALSEmeans that Rmarkdown will not display your code and its output/result. Ifinclude=FALSEandeval = TRUE, the code is still run in the background but the code and the result will not appear in the knitted file (e.g., PDF).
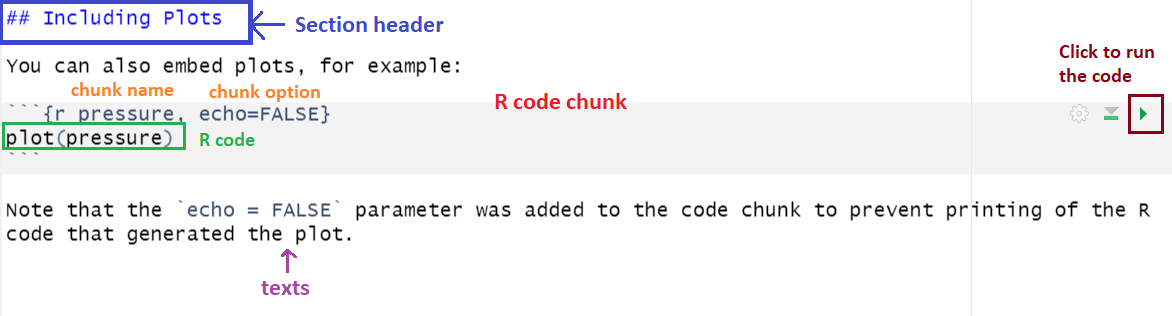
Figure B.2: Components of a code chunk
You can also name the code chunk by typing the name before the comma, for example ```{r your-code-chunk-name, echo=TRUE}. This is useful when debugging your file.
B.2.4 Images
To include images into your file, use
You can change the image alignment, width, height, or write the image caption by specifying the code chunk options fig.align, out.width, out.height, fig.cap. For example: specifying ```{r include-image, fig.align='center', out.width = '50%', fig.cap = 'A cute dog'} for the following code, you will get

Figure B.3: A cute dog
B.3 Knitting A Rmarkdown File
Finally, you can “knit” your Rmarkdown file into a PDF file by hitting the Knit button on the top bar under the file name tabs.
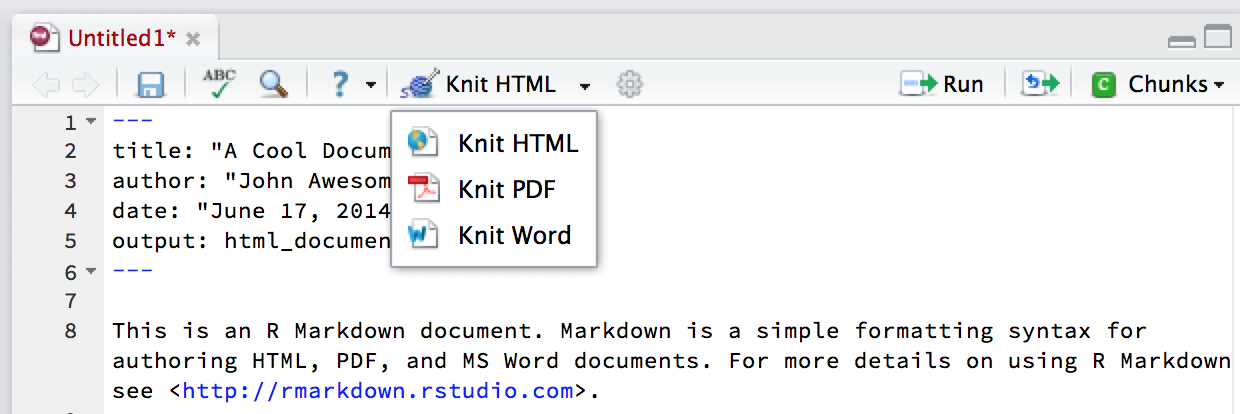
Figure B.4: Knitting an Rmarkdown file
You can also “knit” your file into an HTML file by choosing the corresponding drop-down option. Especially, if you want to produce a PDF but LaTeX is not working, you can knit your file into an HTML and then convert it into a PDF.
Notes: To learn more about Rmarkdown, visit https://bookdown.org/yihui/rmarkdown/.